Showing posts with label card. Show all posts

Friday, January 16, 2009

Card Inspiration

I thought I would share some inspirational cards...by inspirational I mean to inspire you to create some cards...not that the cards themselves have an inspirational theme and tell you to aspire to greatness...although maybe they do!

Anyway, these are not cards I have made, in fact if I had to guess, I would say that Lindsey made both of these. I believe one is from a card swap and another is from a set of cards Lindsey gave me.

This first card is a thank you card. In the picture, I have the card sitting on top of the white envelope. This cute card looks like a little purse.

Recipe: It was made with designer paper cut out in a circle with about an inch not being cut so that it is still connected (Paper is Stampin' Ups "Au Chocolate" which is retired but they have a similar designer paper that you can still buy). The designer paper is double sided so there is another print on the inside which is pictured in the second picture. Then, a pink circle is adhered to the middle with a "Thank You" Stamp going around and around in the circle with a heart stamp in the middle. The words and heart are stamped in chocolate chip brown and the pink heart is colored in with pink marker. The "thank you" circles are on a cream colored circle with pink "daubed" around the edge. The top of the circle has a copper colored library clip on it. The ribbon is laced through two hole punches on the sides of the flat part that holds them together and a pink checkered grosgrain ribbon is ties on one side. The inside follows the same basic theme with circle punches or cutouts and a pink heart stamp. This card is just darling...it could also be switched around and the "Thank you" could be a " You're invited" and it could be a birthday or party invitation for a girls party.


The next card is a birthday card for a boy (or man) and it has an opening on the side and you pull the little green ribbon out and the red card slides out. The car, "beep beep", and stop sign are part of a stamp set, the black uphill road is just black paper, and the scene is on a cream colored background and then adhered to a yellow paper and blue card stock to frame it up nicely. The red card has a hole punched in it to hold the "pull tab" green ribbon which is from Stampin' Ups certainly celery ribbon and it has a stamp that says "driving by with a birthday "Hi"!" and the stop light is from the same stamp set as the car and then 3 buttons are glued on for the lights, a red, yellow, and green button.




( Sorry for the shadow on this picture.)
So, get some inspiration and go make a card for someone. I love to receive handmade cards, I know that the person spent some time on the card and that is better than a store bought card any day!
Have a fun weekend! Be beautiful!
Heather


Tuesday, September 16, 2008

Craft or Card Making- Bookmark: Faith is like a Mustard Seed

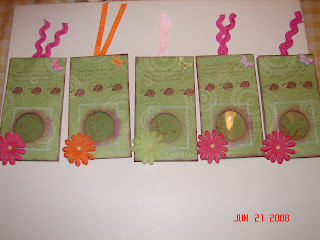
This is a little bookmark thing that I gave to my Primary Class (10-12 year old girls) a few weeks ago. This uses the whole "faith is like a mustard seed" scripture reference. These bookmarks are super cool because the mustard seeds move around when you shake it. You can do other techniques similar to this one with glitter or beads or whatever. I will try to demo how I did this. It is with another card but you can at least see the technique....here goes...


Here are the general supplies...note that on this one I am using salt instead of mustard seeds, I want to give the effect of snow...but you could also reference it to a scripture about salt!
Supplies:
Salt/Mustard Seed/Glitter (Whatever you want to be in there that will move)
Double sided thick tape (green and white)
Super Sticky Thin double sided tape (red roll seen here)
Small piece of acetate or transparency to cover the punch out
Punch
Paper (2) whatever size you want the final to be

#1. Take the paper and make the punch. In this case I used a scalloped or flower punch. I thought it kind of went with the snow flake theme.
#2. Take the super sticky small double sided tape and place it around the punch so the acetate will have something to stick to.
#3. Place the acetate on the tape once you peel back the second side of the tape.
#4 Place the double sided thick tape on top of the acetate around the edge of the punch out so that you cannot see it through the acetate. Note--Keep the second side of backing on the double sides tape until after the next step...I didn't...what a dork!)

#5. Take the salt (or whatever you are using) and place it in the center of the acetate. Use however much or little as you want.

#6. Peel off the backing of the thick double sided tape.

#7. Glue around the outer edged of the 2nd sheet of paper and place the back of the bookmark on top of the other sheet matching up the edges. Press firmly to make sure the glue sticks and the double sided tape is adhered completely.

#8. Now you can decorate...you could also have decorated before you ever did any of this stuff, its just your preference!

Once I get the card finished, I will post the finished product. I want it to be a snow theme, I am just not sure yet what I want to put on it. Stay tuned!

Beautiful Basics

Life is about a journey, and you are the only one who can make yours... So, embrace life: the good, the bad, and the ugly...it is the only one you've got.

Here's to being Beautiful, inside and out!