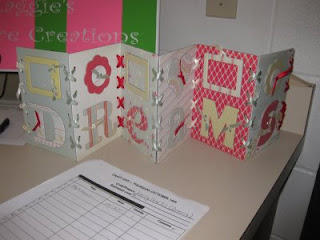
Showing posts with label craft. Show all posts

Friday, May 8, 2009

Gifts: Teacher Bags

I made these bags for the teacher's at my son's school for Teacher Appreciation Week. They were simple and easy, just a little time consuming if you have to do a lot but really not too bad. I stamped their names on with Stampin Up Craft Ink and then did iron on flowers and dragonflies. I think they turned out super cute! They probably work out to be around $3.50 per bag, I think but you could do it for less if you use different decorations or smaller bags.

They came in a 3 pack with denim, pink, and green.


Here is the full shot of one bag.


Here is what it looked like once I rolled it all up and put a thank you card on it that I stamped.


This is just the overhead shot once they were all done.


And a front shot. The 2 denim ones in the back were for his two teachers who are with him the most so I put apples, oranges, and pears in theirs as an additional treat.


It would probably take me 2 hours, start to finish, to do all these, make the cards, roll them up and completely finish. And.....they are so cute!
I think I will make one this weekend that will be my new lunch bag!

Friday, April 17, 2009

Craft: Men's Shirts to Little Girl Dresses!

**Just a reminder to check out the BLOG CANDY a few posts below, the entering deadline is Sunday at 5pm CDT for some scrap booking tools! **


My friend Amanda posted these cute dresses she made and I was floored to see that they were made from Men's shirts! What a clever way to not have to sew buttons! I have sent her a message to see if she has a pattern but I thought I would go ahead and post them so you could see them and maybe figure out how to do these on your own.

You take a normal men's button up shirt.....


and turn it into a cute girls dress.....

the front buttons on the men's shirt becomes the back of the girls dress....


Again, men's shirt....turns into...


A cute dress!!!


and you don't have to sew any buttons!


I love this idea....and I would probably run home and do one if I had a little girl! I guess I should do some for my nieces!
What a cute idea! I searched around the Internet and found the tutorial for this here http://www.craftster.org/forum/index.php?topic=170402.0, it looks pretty straight forward. I think this would be a fun thing to do for a women's night at church....or even for a service project.
Happy Sewing!
Heather

Friday, January 9, 2009

Craft-The Memory Game

As a child, we played the memory game a lot. In fact, my brother was always really good at it and he and my little sister would play for hours.

I found this really cute idea for making your own memory game. She just used chip board, stamps, punches, and scrapbook paper and used modge podge to seal them all. You could probably use a heavy weight card stock instead of chip board.

The link to the picture is http://melissagoodsell.typepad.com/day_to_day/2008/11/memory-cards.html


Here are the pictures from her site. I think you could really have fun with this and do alphabets and numbers and all sorts of things.


She just punches out scrapbook paper with the scalloped square punch and then adheres it to the chip board.
You can also use stamps for fun images.
I love how colorful this is!

What a great idea Melissa!


Saturday, November 29, 2008

Craft-Frame Art

(again, ignore the polka dotted blanket underneath)

This is another super easy craft from retreat. This is a normal frame that you can get at Wal Mart for less than $4. The red paper of the back layer is embossed with black embossing powder. I went for the swirled look with a swirly stamp that I stamped in a Versamark stamp pad and then sprinkled with embossing powder, then held under an embossing tool (or you can use another heat source like a stove, just don't catch the thing on fire, please....you just hold it over the heat until the little embossing sand bead things start to get shiny and melt into each other.)


On the white strip, I embossed with an iridescent white embossing powder with the same swirly pattern, although you probably cannot see it. You take that strip and adhere it to the plain black strip, and adhere that to the red strip.


The words here are a cut out of the Big Shot from Stampin Up and Sizzix, so its just a cut out, although you could use vinyl letters or a rub on or something as well.


Then, you glue all those layers to the mat that comes with the frame, make sure it is centered, and then take some ribbon, and thread it in between the glass and the frame and tie a know. Then, with some black think twine, I attached the charm that is a snowflake.


You have so many variations with this and can do so many things. The original design had snow flakes instead of swirls, but I wanted to keep it up all year around so I did the swirls.


Isn't it beautiful?

Heather

Monday, November 17, 2008

Craft-Paper in a frame

Howdy again...
This is a take off from scrap booking and it is so simple and easy!! If you have a square punch, this goes really quickly. I made this for one of my primary girls who is turning 12 this week. All you do it punch out the squares and put them in a grid pattern and then embellish them with buttons, stamp cut outs, paperclips, ribbon, etc. If your squares do not have enough room to fit all the way across, you can trim them down just a hair to make them all fit nicely.

This frame cost me $1 at the dollar spot at Target and the paper cost is super minimum as well since I already had the stuff on hand. In fact, I think I mainly used scraps, so it was probably a total of less than $2, and it easily could have been cheaper than that! Really, since I had everything on hand, including the frame that I bought months ago, its really just a freebie in my head.

So, enjoy this super simple craft!

Heather

Tuesday, November 11, 2008

Craft: Lace Card


Here is another one of the crafts we did. These were about $5. They were called Lace Up Cards because you basically just put all the parts together and lace up the seems, glue on the letters, etc. It was easy, just a little time consuming so I did it while I was watching tv one night. I will see if I can find a webpage with a link to these because they were super cute and would be little gifts for friends or visiting teachers. They had ones that said "Dreams", "Friends", and "Family" all with different color schemes.
Very cute!

Craft: Wall Art


Howdy,


Here is one of my projects from our big Super Craft Day a few weeks ago. Its just a wooden board, painted red and black, and then the 'Wise Men Still Seek Him" and the picture outline are vinyl rub ons. I can't wait to get this up on my wall!

Tuesday, November 4, 2008

Craft: Papercraft

I was looking at my friend Robyn's blog and thought this papercrafting was so stinkin' cute that I had to share it. I have mentioned it before, but I love taking some ordinary and making it extraordinary....and Robyn did just that! (Way to go Robyn, you are fab!)

Here is the link, check it out! She is one talented lady! http://bobobbin.blogspot.com/2008/10/from-thisto-that.html

Saturday, November 1, 2008

Craft- Candy Corn Cut out


I know this is a little late for Halloween this year, but I wanted to post it in case someone needs ideas next year at Halloween. This is the craft we did for my 2 year old son's class at school. I cut out the 3 parts of the candy corn, the yellow, orange, and white in the shape of a candy corn, then I used a circle punch for the eyes, one size for the green and a smaller size for the black, then a large circle punch for the mouth and I cut it in half. Easy peasy and all the kids had to do was glue it on. I did glue the black on the green for the eyes, but they they glued the eyes on so some of them were cross-eyed and such. They all turned out pretty cute and took just long enough to hold their attention.

Friday, October 17, 2008

Craft:Tile Picture


Hello Folks--


My sister called me tonight and said "You need to post something, I am tired of looking at that turkey!" So, here goes. She also wanted to see all my projects from my Craft Day but I haven't finished them all, in fact this is the only one that is really finished. This looks like a kitchen tile that has had a painting put on it...it is the coolest thing. Its probably been around in Utah for years but we are a little far from Utah and it takes a few years for those cutting edge crafts to come out way.
This is a picture I took out of a calendar that I bought at Half Price Books last week. I will probably pic up this calendar in a few months and wonder what ever happened to November, since it is now missing! Anyway, this was a calendar of French cities and paintings and I have many French pictures and such hanging in my house. We went to France on our honeymoon so it hold a special place in our hearts.
While this project is easy, it is time consuming and does require measuring. I am typically not a big measurer when it comes to crafts, I kind of wing it, but this one takes some exactness so that the lines on your picture line up.
I will have to see if I can find instructions online on how to do this. first you take a board and you saw the "grout" looking grooves into the board. Then, paint the grooves whatever color you want, I chose black which is no big surprise. Then basically, you find a picture you like...we had all sorts...pictured of Families, Christ, Flowers, Calendar pictures, etc...and you cut it out just like the size of each square (yes, you have to measure each square) and you glue it on the board with a plain old glue stick. Its really important to make sure the corners are down well. Then, you pour a large amount of epoxy over it and smooth it out, blow out any bubbles, and then let it sit. Come back every 20-30 minutes and blow out bubbles and look over epoxy. After a while (depends on the humidity) it will start to harden a little, when it does this, you take a Popsicle stick and you drag it through those grout grooves to give the "tile" look of each square. Let it dry over night and you are done. It is shiny and so pretty and looks so classy!
Now I just have to figure out if this really is a Christmas gift or if it is going on my wall!
Put something beautiful in your house...it already has you, so just add to that beauty!

Wednesday, September 24, 2008

Craft-Oatmeal cans to cute container


I love to take ordinary objects and make them into something new and extraordinary! Here is an example. This is just a plain old Quaker Oats Oatmeal can but I took scrap booking paper and my circle and scallop punches and made a super cute container! This would be a fab container for a gift for sometime. You could fit a t-shirt in this, some candy, jewelry, scarp booking supplies...lots and lots of options!


I am one of those people who believes that when you give a gift, the packaging is part of the gift...so I think the packaging should be spectacular. To me it shows that I cared enough to make it really special for that person...and my gift wrapping is always noticed and complimented...so I know it works!


So, anyway, this could be the cutest little pencil or marker holder ever or whatever you can think up in that beautiful head...but turn a bland old item into something GREAT!

Sunday, September 21, 2008

Craft-Lunch bag Scrapbook-an new one

Yep--Still awake!


Here is another lunch bag scrapbook that I did, I took pictures this time before I gave it away. This is one we will be doing for our super craft day our church. I mainly used Bella Rose Designer Paper from Stampin Up and then just a few accents here and there. Its not overly fancy because...well, it was after midnight and I think my fancy juices just plain ran out! But anyway, I needed to get it done so it could go on display tomorrow at church, so its done for now. There will also be a more "boyish" version where I will use Muirfield Designer Series Paper from SU and that will replace the reds and pinks with blues and greens.

This is the cover

One layout--it is supposed to look like presents/gifts and you can put your picture in the middle or journal.
Another layout..have you noticed I love the color chocolate chip?
I think these colors are tres cute!
Just cut the paper in a diagonal and voila! (See, I told you my creative juices were running low)
And the back cover...

I wanted it to be Christmas-y for those who wanted to use it for Christmas but also versatile enough that it could be used for something else. Was I successful? Well, I think so but like I said, its 2 am...what do I know?! I may totally hate it by sunrise!

Tuesday, September 16, 2008

Craft or Card Making- Bookmark: Faith is like a Mustard Seed

This is a little bookmark thing that I gave to my Primary Class (10-12 year old girls) a few weeks ago. This uses the whole "faith is like a mustard seed" scripture reference. These bookmarks are super cool because the mustard seeds move around when you shake it. You can do other techniques similar to this one with glitter or beads or whatever. I will try to demo how I did this. It is with another card but you can at least see the technique....here goes...


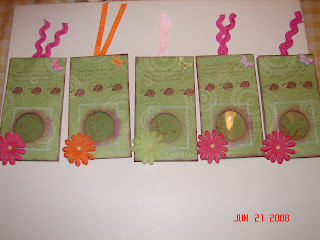
Here are the general supplies...note that on this one I am using salt instead of mustard seeds, I want to give the effect of snow...but you could also reference it to a scripture about salt!
Supplies:
Salt/Mustard Seed/Glitter (Whatever you want to be in there that will move)
Double sided thick tape (green and white)
Super Sticky Thin double sided tape (red roll seen here)
Small piece of acetate or transparency to cover the punch out
Punch
Paper (2) whatever size you want the final to be

#1. Take the paper and make the punch. In this case I used a scalloped or flower punch. I thought it kind of went with the snow flake theme.
#2. Take the super sticky small double sided tape and place it around the punch so the acetate will have something to stick to.
#3. Place the acetate on the tape once you peel back the second side of the tape.
#4 Place the double sided thick tape on top of the acetate around the edge of the punch out so that you cannot see it through the acetate. Note--Keep the second side of backing on the double sides tape until after the next step...I didn't...what a dork!)

#5. Take the salt (or whatever you are using) and place it in the center of the acetate. Use however much or little as you want.

#6. Peel off the backing of the thick double sided tape.

#7. Glue around the outer edged of the 2nd sheet of paper and place the back of the bookmark on top of the other sheet matching up the edges. Press firmly to make sure the glue sticks and the double sided tape is adhered completely.

#8. Now you can decorate...you could also have decorated before you ever did any of this stuff, its just your preference!

Once I get the card finished, I will post the finished product. I want it to be a snow theme, I am just not sure yet what I want to put on it. Stay tuned!

Saturday, August 30, 2008

Coasters


These coasters were done at a Stampin' Up Retreat that I went to last Winter. These are easy and simple to do but you have to be sure to do them correctly. The coaster part is a ceramic tile like they would put on your back splash in your kitchen, the rough stone looking ones. You can get these at any home supply store like Home Depot or Lowes.

Supplies
tiles
damp rag
Large Stamp, the simpler the easier
Stampin Up Staz On Ink Pad or similar permanent ink
Clear Embossing powder
Embossing gun or heat source
Spray on shellac or sealer
4 Felt circles per tile to put on the underside
Instructions:
#1-Clean off tiles with damp rag so they are not dusty

#2-Take Stamp and ink the stamp well with Staz On Ink, make sure it is completely covered

#3-Stamp on the tile, be very still because you do not want to smudge the design. If it is an intricate design, be extra careful and press firmly so the ink is transferred to the tile.

#4 Immediately after stamping the design pour embossing powder over the design on the tile and shake so it covers the entire design, discard the extra in a container and reuse, then immediately clean off the stamp...remember the ink is permanent so you don't want to ruin your stamps!

It is very important that you do this right away after you stamp because the ink dries quickly, so you really must act fast.

#5 With an embossing gun or other heat source, heat the embossing powder until it crystallizes and forms a protective coating.

#6 Allow to dry for 12-24 hours

#7 Spray sealant or coating on the tile so that it is protected

#8 Let sealant dry

#9 Place adhesive felt circle pads on the corners of the underside of the tile

DONE!


Beautiful Basics

Life is about a journey, and you are the only one who can make yours... So, embrace life: the good, the bad, and the ugly...it is the only one you've got.

Here's to being Beautiful, inside and out!