Showing posts with label gift. Show all posts

Friday, May 8, 2009

Gifts: Teacher Bags

I made these bags for the teacher's at my son's school for Teacher Appreciation Week. They were simple and easy, just a little time consuming if you have to do a lot but really not too bad. I stamped their names on with Stampin Up Craft Ink and then did iron on flowers and dragonflies. I think they turned out super cute! They probably work out to be around $3.50 per bag, I think but you could do it for less if you use different decorations or smaller bags.

They came in a 3 pack with denim, pink, and green.


Here is the full shot of one bag.


Here is what it looked like once I rolled it all up and put a thank you card on it that I stamped.


This is just the overhead shot once they were all done.


And a front shot. The 2 denim ones in the back were for his two teachers who are with him the most so I put apples, oranges, and pears in theirs as an additional treat.


It would probably take me 2 hours, start to finish, to do all these, make the cards, roll them up and completely finish. And.....they are so cute!
I think I will make one this weekend that will be my new lunch bag!

Monday, January 5, 2009

Personalized Baking Dish

My sister did this as a craft for her Super Saturday Craft Day in her church and she gave them as gifts. This is a regular baking dish that she has faux "etched" the person's last name on the bottom. This is such a cool technique and you can do endless things with this.

The basic instructions are this...print out the person's last name in a large font, then you tape it to the glass dish. **Please note that pyrex does not work**

You then take some transparent contact paper and you stick it to the other side and then with an exacto knife, you cut out the letters of their name. You can also do designs or little symbols...whatever you want.

Then, you take this glass etching liquid and you paint it on the area that you have cut out. The area where you do not have the contact paper will leave the glass etched look. This is really a fun wedding gift idea because who doesn't take a casserole dish to a church function and then never get it back because no one knows who it belongs to? This is the perfect solution. You can get these glass dishes for less than $10 at your basic discount store and I love to give a personalized gift...so its a win-win!


She also added 2 small ornaments, a cute recipe card, some crinkle paper for cuteness, and the non perishable ingredients for the recipe on the card. On the food containers, she just covered them with cute paper and then wrapped the whole thing in cellophane and tied a big bow on top...it was so cute! (Note on the cake mix, she only covered the front side)

This one is already unwrapped so you can see all the goods inside. For more specific instructions, just see the instructions that come with the liquid and remember to be VERY careful because this is not the kind of liquid that you want to get on your skin or spill on your glass top table!

Friday, December 19, 2008

Craft-Envelope Notebook Set

Heelo from a very cold Nebraska....I am currently in Potter, NE and while I applaud the for having nothing open this Sunday morning...my husband really needs a bathroom! So, we found a local church, hopefully they can find it in their hearts to let this poor Mormon boy join their congregation for a song ans a pee!

Anyway..this is being sent from my phone so please forgive the typos....

Below is another simple gift, its a small notepad in a decorated large mailing envelope. You can make a pocket for a pen or stationary as well. Just add ribbon to the end and decorate as you wish.

My husband is now back from his potty break at the Prairie Hristian Church....low and behold their Reverend is from San Antonio, and was nice and even offered him a cup of coffee! He said is was 26 below here last night....brrrrrrrr! We turned down the coffee and are back on our way to WY....we are about 40 or so miles from the border!!!!

Happy Christmas!
Heather


Saturday, December 13, 2008

Craft-Part of the Gift is the Presentation

Happy Saturday to all!

This has been a busy day of baking. I am done for the day and have made 6 loaves of whole wheat bread, 2 loaves of honey oatmeal wheat, 4 loaves of pumpkin bread plus a few muffins, and a batch of monster cookies! Whew! I have been in my kitchen all day long! I probably would have gotten more done but I ran out of eggs and had to send the hubby out to get some so I had a slight delay. Anyway, these items are all gifts or things to take to parties and such that I have coming up in the next day or so. Tomorrow is my brother's birthday so I am making homemade Macaroni and Cheese for that...yummy! I also plan to make some toffee tomorrow afternoon and probably some pizza sauce for my sons Pizza party on Tuesday, I volunteered to make the pizzas homemade....its better for them and cheaper and I really don't mind. I made the pizza crust a couple of days ago and popped it in the freezer so I can take it out Monday to thaw and make them Monday night for the Tuesday lunch party.

So...back to the title...I truly believe that part of the gift is in the presentation. So, I always try to make things look nice and take some time on their appearance so that they are even a nicer gift than before. Here are some examples from today.

Please forgive the awful quality of these pictures. I cannot seem to locate my good camera so I used my blackjack for these and they are a little dark.


This picture is really fuzzy...sorry...but its just a little clear sack with some cookies in it, a silver bow, and a card that says "Jingle all the way"

A close up of the loaf of bread...

The loaf of bread...


And these are just little lunch sacks with a whole punched and some fun ribbon. I have the little lunch bag scrapbooks inside them. So simple but so fun!
So, the moral of the story is to take a few extra minutes to make the presentation part of the gift! It honestly just makes the gift nicer!
Night Night All!
Heather

Tuesday, December 9, 2008

Gift Ideas-Create your own Calendar

I know many people have the same problem I do...you have that one person on your list that you never know what to get for Christmas or birthday. That person for me is my Grandmother in law. I love this woman...she is wonderful and has always been good to my husband and is kind and caring...and has been an answer to many prayers whenever we prayed for some extra help, there have been a few times when a card came in the mail from her at just the right time.

Anyway...she is in her 80s...maybe even 90s...and lives in an apartment community with other "mature" in age people and participates in activities there. She has really everything she wants or needs and what if she didn't have something and needed it, then she bought it. So, what do you buy her? This year my sister gave me a great idea of making one of those personalized calendars. I have seen them before but when Linz called and asked me to take a look at hers before she completed it, I really liked everything she had done. Come to find out, its easy as pie and it comes with predetermined layouts, you just pick which ones you want and pick from a large variety of backgrounds. She uses shutterfly.com and has for years and has always been pleased with the quality. I decided I would make one for Grand Ma of us and her great grandson so that every month she could look at fun pictures of us and her other family members.

It was easy and with all the great choices Shutterfly had, I came up with the perfect colors to match the pictures and season and I am so pleased with it. I should get them in the mail any day and I can't wait to see them. I will post pictures once they get here so you can see how great they turned out.

I think they run about $20 each, but if you watch for sales, you can get them much cheaper. We got ours when it was $20 for the first one and $10 for each one after that. With more effort but probably less money, you could upload the pictures to photoshop and do your own layouts with some Digital Scrapbooking.

I hope this sparks an idea for your hard to buy for person in your life!

Heather

Saturday, November 29, 2008

Craft-Frame Art

(again, ignore the polka dotted blanket underneath)

This is another super easy craft from retreat. This is a normal frame that you can get at Wal Mart for less than $4. The red paper of the back layer is embossed with black embossing powder. I went for the swirled look with a swirly stamp that I stamped in a Versamark stamp pad and then sprinkled with embossing powder, then held under an embossing tool (or you can use another heat source like a stove, just don't catch the thing on fire, please....you just hold it over the heat until the little embossing sand bead things start to get shiny and melt into each other.)


On the white strip, I embossed with an iridescent white embossing powder with the same swirly pattern, although you probably cannot see it. You take that strip and adhere it to the plain black strip, and adhere that to the red strip.


The words here are a cut out of the Big Shot from Stampin Up and Sizzix, so its just a cut out, although you could use vinyl letters or a rub on or something as well.


Then, you glue all those layers to the mat that comes with the frame, make sure it is centered, and then take some ribbon, and thread it in between the glass and the frame and tie a know. Then, with some black think twine, I attached the charm that is a snowflake.


You have so many variations with this and can do so many things. The original design had snow flakes instead of swirls, but I wanted to keep it up all year around so I did the swirls.


Isn't it beautiful?

Heather

Monday, November 17, 2008

Craft-Modge Podge & Papercraft

First off--Please ignore the messy table in the background...you don't really see that, its your imagination playing tricks on you! (I was taking a quick picture to send to my sister to see if she thought my secret sister would like it and I didn't bother to take a nice pretty picture before I gave it to her, so these are my only shots. Oops! I was scrapbooking and packing and making things all at once so there is quite a hodge podge of crap on that table! Sorry! And sorry for the use of crap if you don't like that word.)


This is a sample of taking something you would normally throw away and making it into something really cute! This is a cream puff container, the kind you buy at Sam's and can never eat just one, it comes with like 50 and they are yummy and great fro parties...I digressed to cream puff heaven there for a second....anyway, I took this container and cleaned it and removed the side labels, the top one isn't removable so I just covered it up. Then I took scrap booking paper (this paper is from the Bella Rose Designer Series with Stampin' Up!) and used Modge podge to glue it to the container and then I went over the paper with Modge Podge so that it would be sealed and shiny. I thought this turned out super cute. I also covered a peanut butter jar (plastic) and a pickle jar (glass) in matching colors and gave them all as a little ensemble of gifts. I filled the peanut butter container with M&Ms.

This was for my "Secret Sister" gift at retreat and she acted like she loved it so I can only assume she does! We do secret pal type things at retreat and its really fun to see what people come up with. This one was a hit!

Craft-Paper in a frame

Howdy again...
This is a take off from scrap booking and it is so simple and easy!! If you have a square punch, this goes really quickly. I made this for one of my primary girls who is turning 12 this week. All you do it punch out the squares and put them in a grid pattern and then embellish them with buttons, stamp cut outs, paperclips, ribbon, etc. If your squares do not have enough room to fit all the way across, you can trim them down just a hair to make them all fit nicely.

This frame cost me $1 at the dollar spot at Target and the paper cost is super minimum as well since I already had the stuff on hand. In fact, I think I mainly used scraps, so it was probably a total of less than $2, and it easily could have been cheaper than that! Really, since I had everything on hand, including the frame that I bought months ago, its really just a freebie in my head.

So, enjoy this super simple craft!

Heather

Tuesday, November 11, 2008

Craft: Lace Card


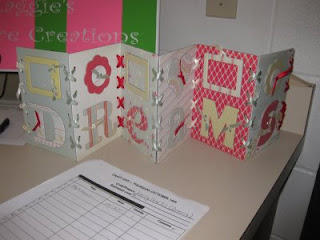
Here is another one of the crafts we did. These were about $5. They were called Lace Up Cards because you basically just put all the parts together and lace up the seems, glue on the letters, etc. It was easy, just a little time consuming so I did it while I was watching tv one night. I will see if I can find a webpage with a link to these because they were super cute and would be little gifts for friends or visiting teachers. They had ones that said "Dreams", "Friends", and "Family" all with different color schemes.
Very cute!

Friday, October 17, 2008

Craft:Tile Picture


Hello Folks--


My sister called me tonight and said "You need to post something, I am tired of looking at that turkey!" So, here goes. She also wanted to see all my projects from my Craft Day but I haven't finished them all, in fact this is the only one that is really finished. This looks like a kitchen tile that has had a painting put on it...it is the coolest thing. Its probably been around in Utah for years but we are a little far from Utah and it takes a few years for those cutting edge crafts to come out way.
This is a picture I took out of a calendar that I bought at Half Price Books last week. I will probably pic up this calendar in a few months and wonder what ever happened to November, since it is now missing! Anyway, this was a calendar of French cities and paintings and I have many French pictures and such hanging in my house. We went to France on our honeymoon so it hold a special place in our hearts.
While this project is easy, it is time consuming and does require measuring. I am typically not a big measurer when it comes to crafts, I kind of wing it, but this one takes some exactness so that the lines on your picture line up.
I will have to see if I can find instructions online on how to do this. first you take a board and you saw the "grout" looking grooves into the board. Then, paint the grooves whatever color you want, I chose black which is no big surprise. Then basically, you find a picture you like...we had all sorts...pictured of Families, Christ, Flowers, Calendar pictures, etc...and you cut it out just like the size of each square (yes, you have to measure each square) and you glue it on the board with a plain old glue stick. Its really important to make sure the corners are down well. Then, you pour a large amount of epoxy over it and smooth it out, blow out any bubbles, and then let it sit. Come back every 20-30 minutes and blow out bubbles and look over epoxy. After a while (depends on the humidity) it will start to harden a little, when it does this, you take a Popsicle stick and you drag it through those grout grooves to give the "tile" look of each square. Let it dry over night and you are done. It is shiny and so pretty and looks so classy!
Now I just have to figure out if this really is a Christmas gift or if it is going on my wall!
Put something beautiful in your house...it already has you, so just add to that beauty!

Monday, October 13, 2008

Recipe: Instant Hot Chocolate Drink

As I mentioned in the below post, one year I gave Hot Chocolate mix as a gift. I actually called it "Snowman Soup" and there is a poem that goes with it that I copied below. I attached a candy cane as a "stirring stick" or you could do a cinnamon stick.

Snowman Soup
Was told you've been real good this year.
Always glad to hear it!
With freezing weather drawing near,
You'll need to warm the spirit.

So here's a little Snowman Soup
Complete with stirring stick.
Add hot water, sip it slow.
It's sure to do the trick!


As I was looking up the poem, I also came across a site that has a printable gift tag, so here is the link for that http://organizedchristmas.com/image/view/636/_original


Here is the recipe I used...

Instant Hot chocolate Drink
1 pound chocolate flavored drink mix
1 1/2 cups powdered nondairy creamer
1/2 cup powdered confectioners sugar
8 cups of powdered milk

Mix all ingredients until well blended. Store in tightly closed container. Use 1/4th cup mix per cup of hot water. Makes 12 cups of mix or 48 servings.

I bought Mason jars and filled them with the mix, attached a cute card with the Snowman Soup Poem and mixing instructions, put some fabric over the top and attached a candy cane with ribbon or twine.

Voila! An easy and inexpensive gift and you can make a bunch of gifts from one batch!

I got some nice compliments on the hot chocolate mix as well, people seemed to really like it. Just make sure that you have the mixture well mixed before you start to put it in the jars so that every jar gets an evenly mixed batch....you wouldn't want someone to get no sugar and just lots of powdered milk. After you fill one jar, I would be sure to remix the big batch just to ensure a consistent product.

Thursday, August 28, 2008

HFPE Idea- Saving pennies!

My sister's ward just had an HFPE that covered 2 topics: saving pennies and "your favorites". The first part they had someone offer suggestions on ways to save money and find freebies. Below are some of the suggestions (thanks to Lindsey, Tonya, and Cori!) I think you could also go further if you needed more classes or time to fill by adding a class on budget cooking ideas.


Ideas on saving big with just a little effort

  • Go to freebie web-sites, Tonya suggested checking out the freebie groups on yahoo (Heart of Texas Free-cycle)
  • MyPoints.com -If you know a member of My points, be sure to get a referal from them so they get extra points! But you can join either way. *Printable coupons*
  • Craig’s List is a local classified adds, look for the “free section”
  • Go to the specific web-sites of the companies who make your favorite product On-line surveys often reward you with free items or coupons
  • Coke bottle caps can be redeemed to give you spending money at the Coke store
  • Cash in your rebates (Office Max & Office Depot often have these available)
  • Sign-up for Newsletters and Birthday Clubs (Sonic, Dairy Queen, Chuck E. Cheese) AFullCup.com is “a freebie Mecca”
  • Target.com (look for Super Target.com at the bottom for coupons)
  • Mr. Ink Jet is good for printer ink savings
  • TotallyFreeStuff.com
  • Wal-Mart free samples (go to WalMart.com main stores now offer free sampler)
  • Hobby Lobby.com gives a weekly coupon & for Michael’s on-line as well

Thanks for these great tips!

Then they also had the sisters bring something or somethings that were their "favorite things", like show and tell. I think this was similar to Oprah's favorite things...except less screaming and not free stuff for all. This was a way for sisters to share things they love with other sisters and you learned something about the sister as well.

Here is a sample of some of the things that were shared by some sisters. (I think this is a really fun thing, I have to think about what I would have brought!)


People's "Favorite Things"
-Pampered Chef mini-whip, Johnson & Johnson’s Soothing Naturals Baby Wash/Lotion
-National Geographic Magazine, Tabernacle CD, “Love is Spoken Here”
-One sister loves information, so she shared some research on heart attacks and second degree smoke
-Stephanie Meyer’s Twilight book series
-SA8 Pre-wash for spots on laundry (only available on-line), Color care Shielding Shine Mist by Biolage, Zero Frizz for hair
-Sketcher shoes ordered from endless.com where you can ship it back for free if they don’t fit.
-Facing the Giant (movie), Harry Potter book series
-Stampin’ Up!’s table top cutter (ka-chunk), Special K’s Chocolaty Cereal, 101 Meals to Cook in a Slow cooker, amazon.com for books, & usps.com for mailing stuff from home
-Feminine Screwdriver with changeable head

I have to agree with many of these items listed...the Stampin Up Paper Cutter is also one of my favorites, I just found Special K Chocolaty Cereal and am such a fan....and the Feminine screwdriver is something I have and love. I have a matching tape measure to go with it. It is my personal "tool set" and I keep it where I can always find it....plus its way to girlie for my hubbie to want to use it! Here is a picture of mine...

This is the hammer with all the components inside.
And this is the hammer once you unscrew the handle and take out the 3 different screwdrivers with different heads and sizes. This was given to me by my boss for Christmas a few years ago and I LOVE IT! It is a great gift for the girl who has everything!

Let's see....my favorite "things" would be chocolate cake, Estee Lauder Foundation ( I have a really hard time finding foundation that matches my PALE skin color and Estee Lauder is the ONLY one that works for me...believe me, I have tried TONS of products because I was in search of a cheaper brand...but I give up and will only wear Estee from now on...its true to me so I will be true to it! It was a bummer one day when I realized my real skin color was "translucent!")

Another favorite, I love Stampin Up Products for Scrapbooking and Card Making because everything matches...the paper matches the ribbon color, matches the buttons, etc. I really hate it when I buy lovely ribbon and paper and the reds do not match so now I just buy SU products because I can trust them and the quality is superb. You can view their catalog online http://www.stampinup.net/esuite/home/stampwithlinz/ and Lindsey is a great demonstrator and I am not biased at all!

I also love whole wheat pastry flour. I have been trying to substitute whole wheat for white wheat in a lot of my recipes and I have found that the ww pastry flour makes a good substitute on many things!

So, post a comment on your favorite things! I would love to hear some!

Make every day beautiful!

Heather

Wednesday, August 27, 2008

Craft-Paper bag Scrapbook

I was lucky enough to get this fabulous scrapbook at a Scrapbooking retreat I go to twice a year with my sisters. They choose names for us and we have a "secret sister" that we do 3 little gifts for throughout the retreat and then you reveal who you had at the end of the retreat...its a TON of fun...and the retreat is the BOMB...we have so much fun...I get giddy just thinking about it because my next one is less than 100 days away. My sisters and our friends go and its for 2 days and we are just in scrapbooking heaven. You gotta try it!

Anyway--I digress...this is the Scrapbook that my friend Mickey made for me. (I have been lucky over the years to have Mickey be my secret sister twice!) I have a little boy so this is a perfect scrapbook for me to put pictures in. In case you cannot tell, it is made out of school lunch paper bags...the little brown ones. The instructions on how to make one of these are here http://scrapbooking.about.com/library/weekly/blpaperbagscrapbooks.htm
you can go in and decorate the inside with stickers and paper and little pull out things since the sides of the bags that are open are still open, they become little pockets for little treasures.

I love this because it is so simple and uses simple items that are easy to find. you can decorate with scraps and doodads and make it Oh So Cute!

Here are some inside pages.... This page on the left is a pull up tab, so you pull on that little gadget and then you can see the entire picture. On the right under the "ribbit" there is a pocket in between the green paper and the checkered paper that is also a pocket for a picture.

And another page...
If you try this, I would love to see what you come up with! The possibilities are endless and you can't get more basic than a brown paper lunch bag...beautiful!

Beautiful Basics

Life is about a journey, and you are the only one who can make yours... So, embrace life: the good, the bad, and the ugly...it is the only one you've got.

Here's to being Beautiful, inside and out!